Continue Deployment After Plug in Job is Completed
-
The following steps explain on how to deploy a plug-in on OMS.
- Log into an Oracle Enterprise Manager Cloud Control web console with administrative privileges.
From the Enterprise Manager Cloud Control web console, navigate to
Setup → Extensibility → Plug-ins.- In the Plug-ins page, select the Dell EMC Management Software row under the Server, Storage, and Network folder.
- Click Deploy On from the menu above the table and select Management Servers from the drop-down list.
- In the Deploy Plug-in on Management Servers: Prerequisites Check window select Dell EMC Management Software and click Next .
- Review the results of the prerequisite check and click Next .
- Provide the SYS credentials as displayed below and click on Next.
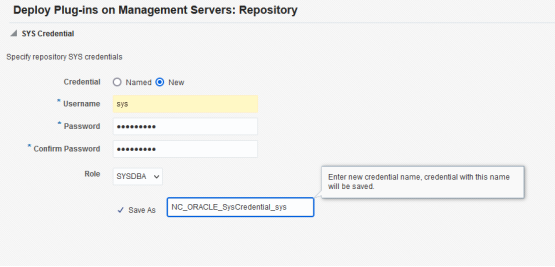
Figure 3. SYS credentials page while plugin deployment on Server.
- If the details in the review page are correct, click the Deploy button to begin the plug-in deployment.
Note : The review page displays the management servers on which the plug-in is being deployed, the version of any previously deployed Dell plug-ins, and the status of the OMS.
- To view the progress of the plug-in deployment, click Show Status on the Confirmation window.
Note : We recommend viewing the status of a job or task in OEM when available. This helps ensure that no issues arise during deployment.
- The On Management Server field, for the plug-in, should now display the deployed version of the Dell EMC OpenManage plug-in for OEM. To view this field, navigate back to the Plug-ins page (Setup → Extensibility → Plug-ins).
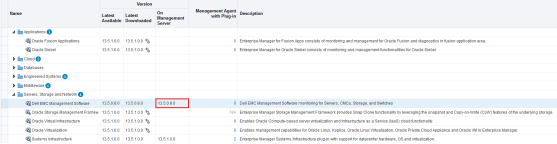
Figure 4. Verifying Plug-in deployment on OMS
Deploying the plug-in on an OMA
The following steps explain on how to deploy a plug-in on a central or remote OMA.
- Log in to an Oracle Enterprise Manager Cloud Control web console with administrative privileges. s
- From the Cloud Control web console, navigate to Setup → Extensibility → Plug-ins .
- On the Plug-ins page, select the Dell EMC Management Software row under the Server, Storage and Network folder.
- Select Deploy On from the menu above the table and select Management Agent from the drop-down list.
- Click Continue on the window Deploy Plug-in on Management Agent.
- Search for the Agents under the various search options provided use this OEM window to find one or more OMAs acceptable to have the plug-in deployed and installed on as per below screenshot.
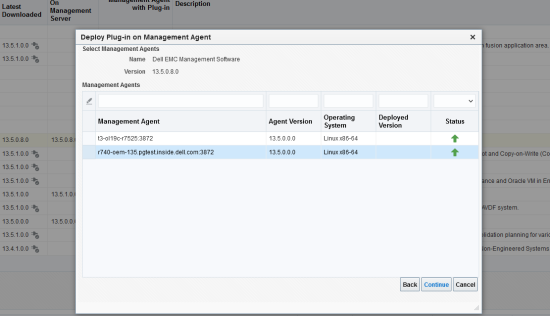
Figure 5. Selecting appropriate agent while deploying Agent
- After selecting the appropriate OMA, click Continue on the Deploy Plug-in on Management Agent window.
- Review the results of the prerequisite check and click Next .
- If the details in the review page are correct, click Deploy to begin the plug-in deployment.
- To view the progress of the plug-in deployment, select Show Status on the Confirmation window.
Note : We recommend viewing the status of a job or task in OEM when available. This helps ensure that no issues arise during deployment.
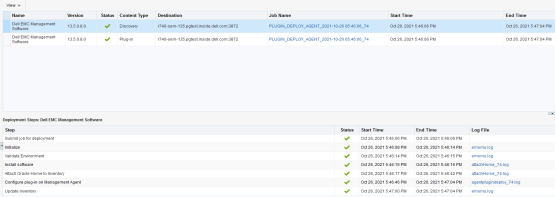
Figure 6. Status update screen for plug-in deployment on the agent
- The Management Agent with Plug-in field, for the plug-in, should now contain the number of OpenManage plug-ins that were deployed to OMAs. To view this field, navigate back to the Plug-ins page (Setup → Extensibility → Plug-ins).
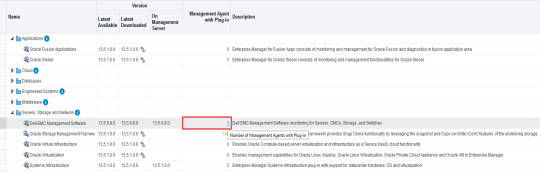
Figure 7. Verifying plug-in deployment on OMA
Manually Adding the OpenManage Target
The following steps explain on how to create and configure an OpenManage Enterprise target inside the Oracle Enterprise Manager. This ensures that the plug-in will collect Dell PowerEdge server device metrics as part of the integration process.
- Log in to an Oracle Enterprise Manager Cloud Control web console with administrative privileges.
- From the Cloud Control web console, navigate to Setup → Add Target → Add Targets Manually.
- Under the Add Non-Host Targets Manually section click Add Target Manually .
- To fill in the Agent Host field, click the search icon to the right of the text box. This will display the Select Host window. Select the OMA to configure the plug-in to from this window and click Select .
- For Target Type field select the Dell EMC Management Software from the drop-down list and click Add to continue to the plug-in configuration page.
- In the configuration page, set the values for customizing the plug-in connection to the OpenManage Enterprise.
- Target Name (required): An instance name desired for the OpenManage Plug-in target. This name is used to reference this specifically configured target and sub- targets inside of OEM.
- Dell EMC Management Software Hostname (required): The fully- qualified host name of the system where OpenManage Enterprise is installed. This must be the same host name that is used when connecting the OpenManage Enterprise web console.
- Dell EMC Management Software Port : The port that Dell OpenManage Enterprise is running on. This value is optional, if it is not provided, the plug-in will use port 2607 by default.
- Password (required): A valid password in combination with the associated username is needed to connect to the Dell OpenManage Enterprise web services. The account used should have at least OME Users privileges.
- Username (required): A valid username in combination with the associated password is needed to connect to the OpenManage Enterprise web services. The account used should have at least OME Users privileges.
- View Acknowledged Alerts (yes/no) (required): If this value is set to no, plug-will not collect device alerts that have been acknowledged in OpenManage Enterprise. The plug-in will be set to yes (default), if no value is set for this field.
- Use the Test Connection button in the top right of the screen to test the credentials provided in step 6. This ensures that the plug-in can properly connect to the OpenManage Enterprise system and collect data.
- If the test connection result is successful, click OK to finalize the target configuration.
To view the Dell OpenManage Enterprise target that was just created, navigate to Targets → All Targets and look through the table of targets for the instance name that was used during configuratio n.
Note : It may take up to 20 minutes for completion of the first collection interval for the target

Figure 8. Adding Targets Manually confirmation page
Discovering device sub-targets
The discovery process will find all targets related to a Dell OpenManage Enterprise target. This includes servers, chassis controllers, storage, and switches.
- Log in to an Oracle Enterprise Manager Cloud Control web console with administrative privileges.
- From the Enterprise Manager Cloud Control web console, navigate to Setup → Add Target → Configure Auto Discovery .
- Under the Configure Auto Discovery section, click the Targets on Hosts tab.
- Select the appropriate host being used for the OpenManage Enterprise target and click Discovery Modules .
- Uncheck all options except for Dell OME Discovery Module to disable the discovery of other targets unrelated to this plug-in.
- Click OK .
- Select the same host selected in step 4 and click Run Discovery Now .
Promoting discovered device sub-targets
The plug-in has a discovery feature that can discover newly added devices in Dell EMC OpenManage Enterprise and present in OEM. This feature allows the user to promote a monitor specific device. The following steps describe how to promote a discovered device with specific target name.
- Log in to an Oracle Enterprise Manager Cloud Control web console with administrative privileges.
- From the Enterprise Manager Cloud Control web console, navigate Setup → Add Target → Auto Discovery Results.
- Under the Auto Discovery Results section, click the Targets on Hosts tab.
- Select all targets in this list (which have the Target Name as prefix) from where you want to collect data and click Promote .
Note: The time between the target being promoted and data for the target returning is dependent on the configured collection interval of the OMA.
Source: https://infohub.delltechnologies.com/l/installation-guide-dell-emc-openmanage-plug-in-for-oracle-enterprise-manager-13c-1/deploying-the-plug-in-5
0 Response to "Continue Deployment After Plug in Job is Completed"
Post a Comment